


 리드 10.16mm(0.4\") 센서 포함")
 리드 5.08mm(0.2\") 센서 포함")
 리드 2.54mm(0.1\") 센서 포함")
 리드 12.7mm(0.5\") 센서 포함")
 리드 8mm(0.314961\") 센서 포함")
 리드 12.7mm(0.5\") 센서 포함")
 리드 6.35mm(0.25\") 센서 포함")
 리드 6.35mm(0.25\") 센서 포함")
 리드 2.54mm(0.1\") 센서 포함")
 리드 4mm(0.15748\") 센서 포함")
 리드 2.54mm(0.1\") 센서 포함")
 리드 2mm(0.07874\") 센서 포함")
 리드 12.7mm(0.5\") 센서 포함")
 리드 6.35mm(0.25\") 센서 포함")
 리드 2.54mm(0.1\") 센서 포함")
 리드 10.16mm(0.4\") 센서 포함")
 리드 5.08mm(0.2\") 센서 포함")
 리드 2.54mm(0.1\") 센서 포함")
 Nema 34 스테퍼 모터 및 드라이버 및 60V 전원 공급 장치")
 Nema 34 스테퍼 모터 및 드라이버 및 60V 전원 공급 장치")
 Nema 34 스테퍼 모터 및 드라이버 및 60V 전원 공급 장치")
 Nema 23 스테퍼 모터 및 드라이버")
 Nema 34 스테퍼 모터 및 드라이버 및 60V 전원 공급 장치")
 Nema 34 스테퍼 모터 및 드라이버")
 Nema 23 스테퍼 모터 및 드라이버")
 Nema 34 스테퍼 모터 및 드라이버")
 Nema 34 ステッピング モーター & ドライバー")
 Nema 34 스테퍼 모터 및 드라이버 및 60V 전원 공급 장치")


")
")


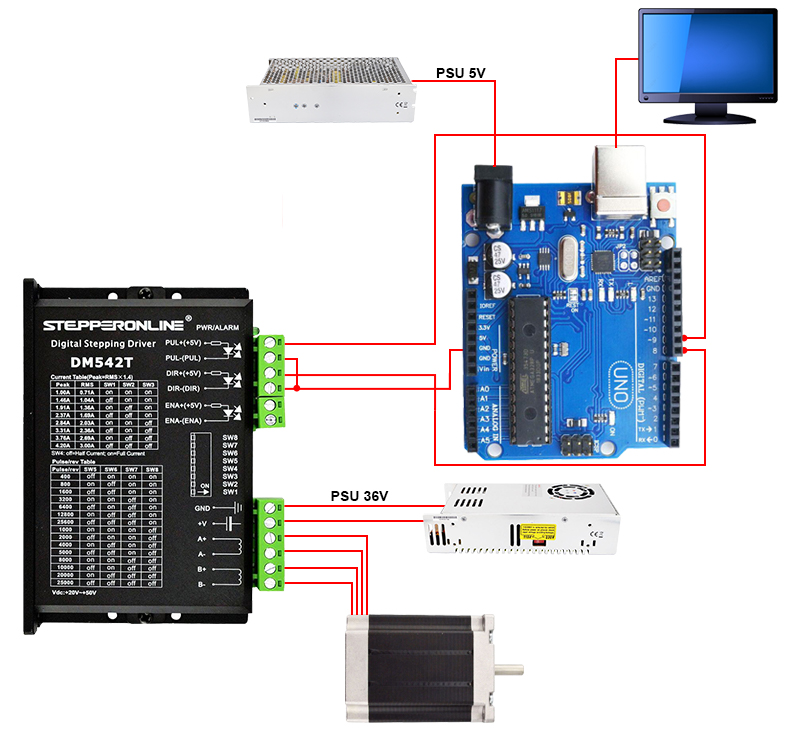
아래 단계에 따라 스테퍼 드라이버를 Arduino에 연결하십시오.
1. 드라이버의 DIR+와 PUL+를 아두이노의 디지털 포트에 연결합니다. 예를 들어 PIN8 및 PIN9.
2. PUL- 및 DIR-를 Arduino의 GND에 연결합니다.
3. PIN8과 PIN9가 DIR과 PUL을 가리키도록 하여 컴퓨터에 프로그램을 작성하십시오.
4. 아두이노에 프로그램을 다운받아 아두이노에 5V 전원을 공급합니다.
아래 회로도는 Arduino, 스테퍼 드라이버, 전원 공급 장치 및 스테퍼 모터의 기본 연결을 보여줍니다.
우리는 또한 간단한 데모 코드를 제공합니다
int x;
void setup()
{
pinMode(9,OUTPUT); // set Pin9 as PUL
pinMode(8,OUTPUT); // set Pin8 as DIR
}
void loop()
{
digitalWrite(8,HIGH); // set high level direction
for(x = 0; x < 400; x++) // repeat 400 times a revolution when setting 400 on driver
{
digitalWrite(9,HIGH); // Output high
delayMicroseconds(500); // set rotate speed
digitalWrite(9,LOW); // Output low
delayMicroseconds(500); // set rotate speed
}
delay(1000); //pause 1 second
digitalWrite(8,LOW); // set high level direction
for(x = 0; x < 400; x++)
{
digitalWrite(9,HIGH);
delayMicroseconds(500);
digitalWrite(9,LOW);
delayMicroseconds(500);
}
delay(1000);
}